

How to Make a Drone Film – The Ultimate Guide
There’s no denying the fact that drones are a brilliant tool for a filmmaker to have in their arsenal. With drones now equipped with higher standard cameras, improved flight times and incredible intelligent flight modes, there’s never been a better time to be an aerial filmmaker.
That being said, shooting a high quality aerial film isn’t as simple as hitting the record button, sending your drone up and flying around for a few minutes. A lot of practice, planning and time is required to put together a beautiful, professional standard film.
If you’re looking for some inspiration, check out this film, which was the winner of the Landscape category in the DFF ANZ film festival. The film features some stunning cinematography alongside some well used special effects and perfectly executed drone shots.
The Different Stages of Production
No matter whether you’re shooting a small independent film, or a high-budget Hollywood blockbuster, the process of creating a film can be broken down into 3 distinct stages. I’ve listed these 3 phases below and will explain what each one entails.
- Pre-Production – This is essentially the planning stage, where you get every aspect of the film ready to shoot.
- Production – This is the shooting stage of production, where you’re out recording the footage for your film.
- Post-Production – The third and final stage of production, where you put the footage together, add the finishing touches and get the film ready to be shown.
Pre-Production
I’m going to be honest, I’m not the most organized person in the world. For me, the pre-production stage is the toughest, as I’m eager to get out there and start shooting some incredible stuff.
Unfortunately, the reality is that the pre-production phase can either make of break your film. Follow the steps that I mention below, and you’ll have yourself a nice and organized shoot.
Decide on Your Film’s Story/ Message
It’s always a good idea to have some kind of story behind your film. Whether the story is of a place, event, or following a narrative is up to you.
Location Scouting
Find some places that you think will be a good match for your film. It’s best if you can go there in person and take some photographs, which you could even do with your drone. That way, you know exactly what the location looks like and will be able to create a more tailored shot list.
If you’re unable to actually make it to your location in person, you can always utilize the handy power of Google Maps. You can set the map to a ‘satellite’ view, which will show you an actual image of the place and allow you to get to grips with the lay of the land.
Make A Shot List
It’s a good idea to plan out exactly what shots you’re going to be recording on shoot day.
Of course, allow yourself some time to scope out some new angles that you may not have thought of, but it’s best to have a pretty solid idea of what you’re going to be filming. By having a shot list you’ll know clearly what you’re going to be shooting, allowing you to go from shot to shot, with minimal time wasted.
Permission
Depending on where you’re planning on flying your drone, you may need to get permission first. The last thing you want to happen is to have to stop shooting and perhaps be on the receiving end of a pretty nasty fine.
Do You Have the Right Drone?
The quality of footage you’re able to record will depend heavily on the quality of drone you have. If you haven’t got a drone yet, this buyers guide will walk you through what you need to know. When looking to buy a drone for aerial cinematography, make sure the drones’ camera is attached by a gimbal stabilizer. This is extremely important as it will keep the camera steady when you’re in the air, which in turn will make your footage look more stable and professional.
Production
Tips for Shooting High Quality Aerial Footage
Utilize 2-Axis of Movement
In high budget Hollywood movies, you’ll notice that their aerial shots tend to incorporate 2-axis of movement. When shooting your aerial film, try and mimic this technique, which can be done by tilting the camera whilst the drone is moving. This will create more movement in your shot and look extremely professional.
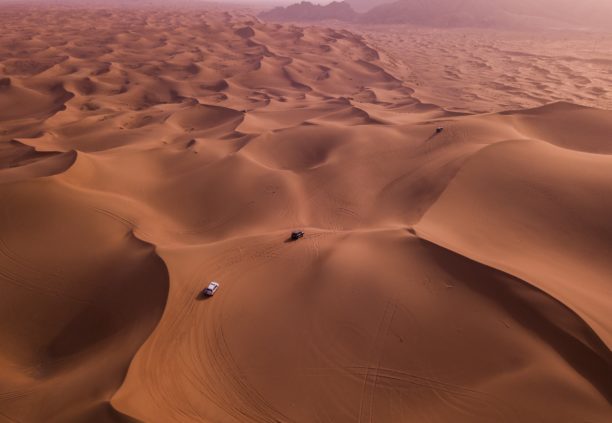
Golden Hour – What is it & How Can You Use It?
The golden hour is the first hour after sunrise and the last hour before sun set. During this time period, the sun creates a naturally orange and red tint that looks great when captured on film. By shooting in this time period, you make your footage look more aesthetically interesting and appealing, without having to do anything different.
Shoot in the Right Weather Conditions
These days a drones tend to come with high quality gimbal stabilizers that do a great job at keeping the camera steady. That being said, they’re not perfect. If the winds are too high the drone may get blown around, which can result in your footage looking jolty and unprofessional.
This in turn can not only ruin your shot, but your entire day shooting. A few days before you shoot, start to keep an eye on the weather conditions. If you’ve got a feeling that the conditions aren’t going to be great, then perhaps postpone the shoot.
As well as this, if you’re shooting on a gray and over cast day, this is going to have an effect on the overall feel of your film. Try and shoot when the conditions are bright, especially if you’re focusing your film on a specific location, as you want it to look as nice as possible.
Have the Right Camera Settings
This may sound obvious, but it’s easy to take off and start flying without taking the time to adjust your camera settings. Try and always shoot with the lowest ISO possible, as the higher it is, the grainier your footage will look. Similarly, if you’re wanting to shoot some slow motion shots, make sure you set your drones camera to record at a higher frame rate. This one’s always easy to forget, so have it included in your pre-flight checklist.
Use the Rule of Thirds
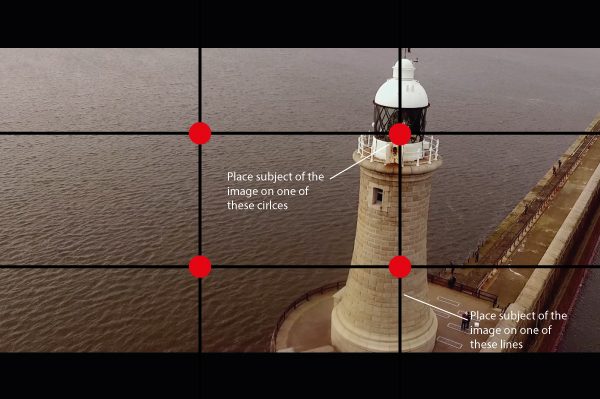
The rule of thirds is a commonly used rule for both photographers and filmmakers. The basic idea behind the rule is to break the image down into thirds. You should be able to set your display to ‘grid mode’ which will section your screen into 9 parts, with two lines going vertically and two lines going horizontally.
You place the subject of your shot either on one of these lines, or where two of these lines intersect one another. The reason behind this rule is that our eyes naturally fall onto these lines and intersections, so if the subject is placed there, we find it more aesthetically appealing. For any more information on the rule of thirds, you can read this in-depth article.
Of course, you don’t always have to stick to this rule and after all, rules are made to be broken. Wes Anderson for example, is famous for breaking this rule, instead opting to use symmetry over the rule of thirds.
5 Drone Shots to Master
Birds Eye
This one’s pretty self explanatory and is one of the easiest shots to pull off. Simply tilt your camera all the way down, so it is directly pointing down towards the ground. You then have a number of options in terms of movement with a bird’s eyeshot. You can either track the subject if it’s moving, keep the drone completely still or you can increase the altitude of the drone.
I personally like to have some form of movement in the shot, but it’s completely up to you.

Reveal
There are a number of ways you can do a ‘reveal’ type shot. You can fly your drone backwards over the subject of your shot until it comes into frame. Or, you can utilize the movement of your drones’ gimbal to reveal the focus of your shot. Either way, make sure what ever you’re revealing is interesting and worth a ‘reveal’ shot.
Flying Backwards
This is a simple, yet effective shot that all drone pilots should utilize. It’s worth mentioning that whenever you’re filming with a drone, try and always fly backwards. This is because when you fly forwards, you can sometimes get the front propellers in the frame, ruining the whole effect of the shot.
Similarly, it also helps to prevent prop shadows from being picked up by the camera.
Orbit
Most drones these days come with an array of intelligent flight modes, with one of the most common modes being orbit/ point of interest. This is when your drone circles an object, whilst keeping that object in the center of the frame. I personally love this shot as it looks extremely cinematic and is very easy to pull off, especially if you’ve got some intelligent flight modes.
Tracking Shot
Whether you’re filming on a drone or using a hand held camera, tracking shots have long been a go-to shot for filmmakers.
This is simply where you follow the subject of your shot, usually from behind. That being said, you can experiment with different angles until you find one you particularly like. If you want to track yourself with a drone, a number of UAVs have a ‘follow me function’. I love using this as it means I get to be in some of my shots, which is pretty rare as I’m usually focusing on piloting the drone.
Post Production
Editing Software
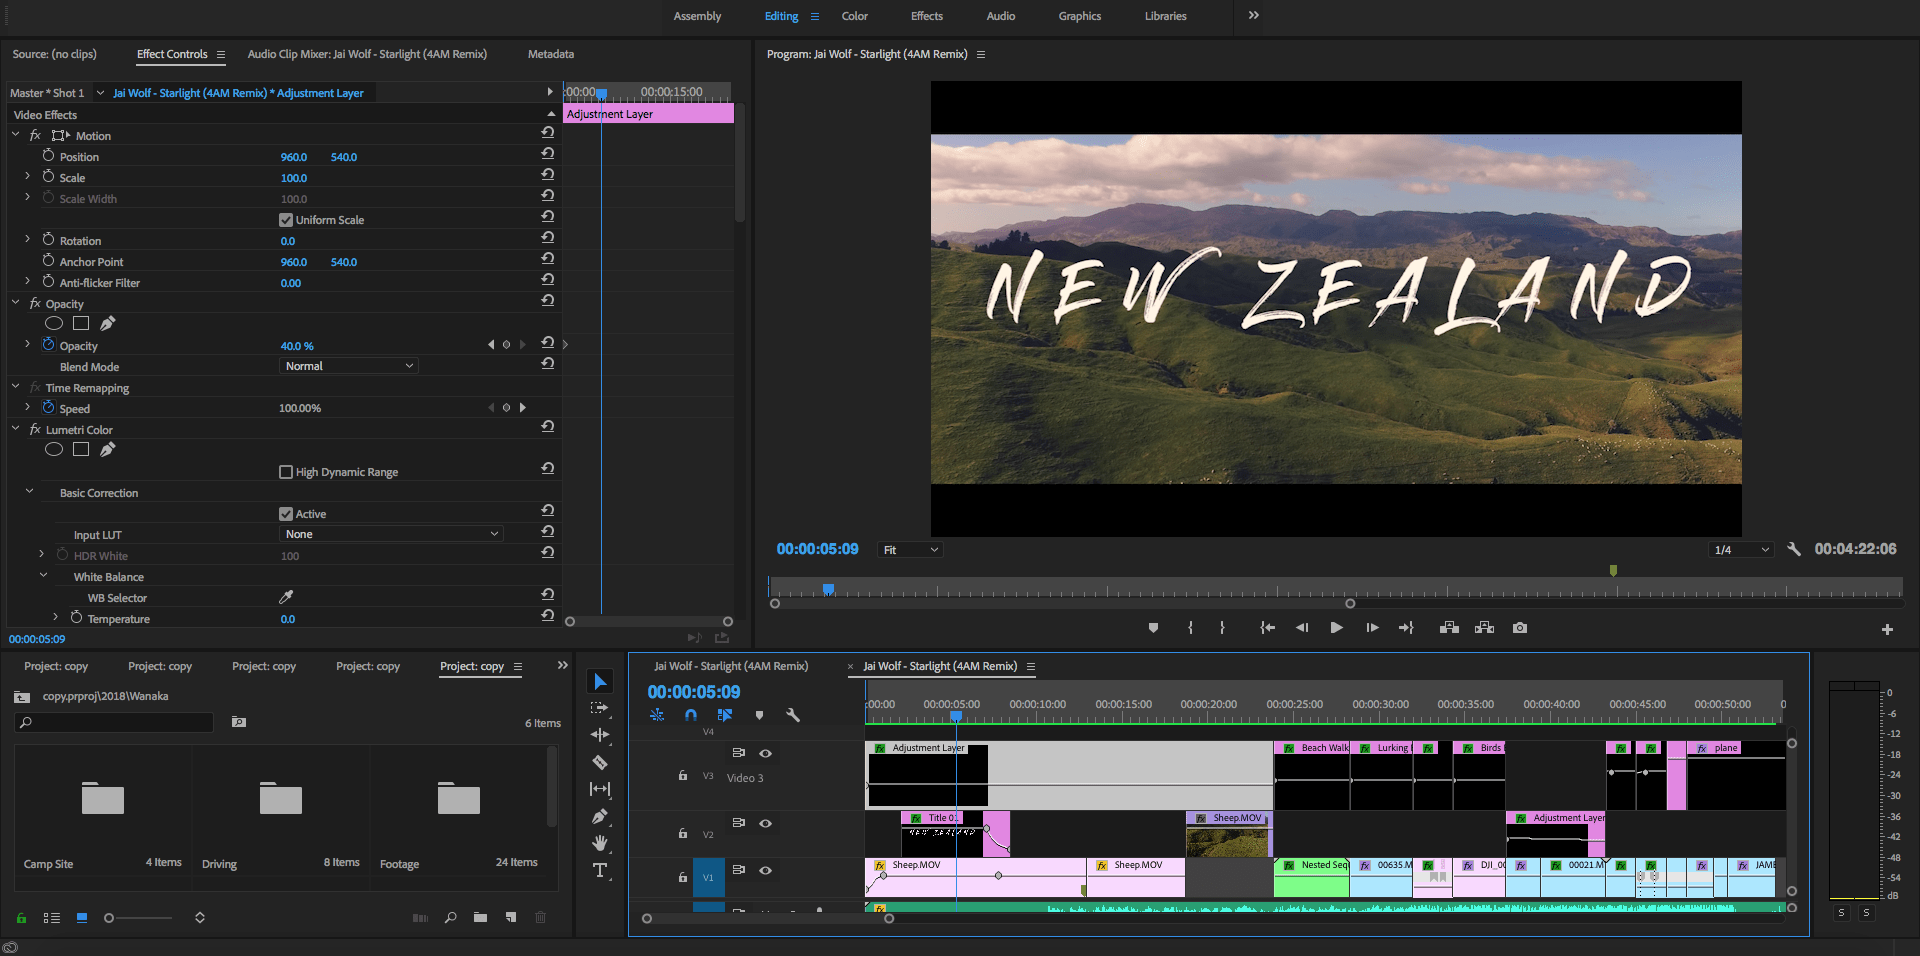
In order to put your spectacular drone footage together, you’re going to need some form of editing software. I wouldn’t recommend using free software such as Windows Movie Maker and iMovie, as although they allow you to put one shot next to another, they’re pretty limited.
I’ve listed below some examples of editing software that are perfect for editing a drone film. I myself am a massive fan of Adobe Premier Pro and highly recommend it. If you’ve ever used any other Adobe software like Photoshop or Illustrator, you’ll be able to pick up Premier Pro in no time at all.
- Adobe Premier Pro – My editing software of choice.
- Final Cut Pro – Great for Apple Mac fans.
- Sony Vegas – I’ve never personally used this, but I’ve heard from a number of reliable sources that it’s very good.
- Avid Media Composer – Pretty much the industry standard editing software.
Color Correction
A great way to take your footage to the next level is to use color correction. This is when, using your editing software, you adjust the colors of your footage. When doing this, try and maintain a similar coloring throughout your film, as it will look a bit strange when the colors change dramatically from one shot to the next.

Music/ Sound Effects
Adding music and/or sound effects to your film is a must! Unfortunately, finding the right music can be a pretty tedious process, but trust me it’s worth it. There are a number of sites out there, both free and paid, that offer music that you can use in your films. A few popular choices are:
- YouTube Audio Library
- BenSound.com
- Purple-Planet.com
All of the above mentioned websites offer royalty free music that you can use in your drone films.
Similar to music, sound effects are another way to add more depth to your film. For example, if you’ve got a shot on a beach, add some sound effects of waves crashing, or perhaps the sound of seagulls. Although a small touch, this can have a major effect on the overall feel of your film.
Sharing Your Film
What’s the point of going to all that effort of making an amazing drone film if no one is going to see it?
YouTube
YouTube is by far one of the most popular video sharing platforms and is a great place to showcase your new film. You can always start a YouTube channel and continue to upload your new drone films and can even generate an income with YouTube’s Partner Scheme.
Vimeo
Vimeo is more of a professional standard video sharing website and it is where most serious filmmakers go to upload their work. Unfortunately, there’s a 500mb weekly upload limit unless you pay for a yearly membership, which is probably why most people turn to YouTube.
Film Festivals
Over the past few years, we’ve seen a number of drone specific film festivals pop up around the globe. These are a great way to both showcase your work and compare yourself against some of the best in the world. A few of the major film festivals are:
- New York City Drone Film Festival
- Drone Film Festival Australia & New Zealand
- London Drone Film Festival
- Madrid Drone Film Festival
- Flying Robot International Film Festival
What do Jury Members Look for?
A drone film festival will often have a panel of jury members who are tasked with judging each individual film and selecting a winner for each category. When judging, jury members will look for films that are shot and edited to the highest standard. This includes the framing of the shots, the movement of the shots and the overall cinematic quality of the film.
Don’t worry massively about the quality of your drones’ camera, as long as it’s HD it will be fine. Personally, when judging a film festival, I look for how the drones’ camera is used, rather than the quality of camera itself.
Round Up
Making an aerial film with your drone is an incredibly rewarding and fun experience. Although it can be stressful at times, the end result is always worth it. A great film starts with a great plan, so make sure you’re as organized as possible with your pre-production!
If you’ve got any questions, please feel free to comment below.

