

Sponsored by DroneDeploy —
Jeff Foster, an expert in 3D modeling, share his best practices –
As we found in our Commercial Drone Industry Trends, more and more people (30% of our users!) are using drones to make 3D models. It’s simple to make a 3D model with DroneDeploy, and in fact, every map includes a 3D model view — but to make a high-quality model that looks great from every angle, there’s a bit more to it.
To help you learn how to make better 3D models, we talked to an expert and asked him to share his tips and tricks.

Jeff Foster, Co-Founder of Sound Visions Media and Editorial Director of Drone Coalition is no stranger to 3D modeling. He’s been doing 3D modeling, rendering and animation since the early 90s and has even written 10 books on the subject. In 2012, Jeff was working with the Pro Video coalition writing articles on GoPro cameras when he was contacted by DJI to review their new drone. He got one, took it out, and thought, “this changes everything”.
When he first began making 3D models with his drone, Jeff used desktop software to process the imagery. Then he found DroneDeploy.
“It’s so much faster and cleaner. The models themselves, and to be able to show them to people with the link — have just been phenomenal.” — Jeff Foster

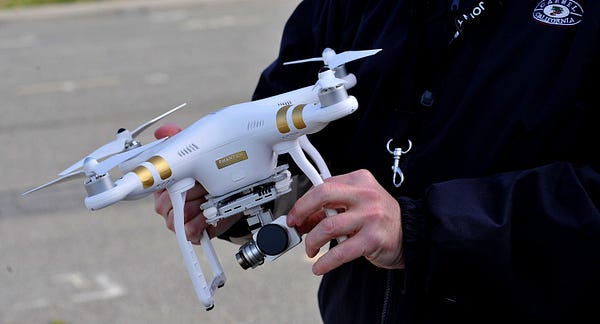
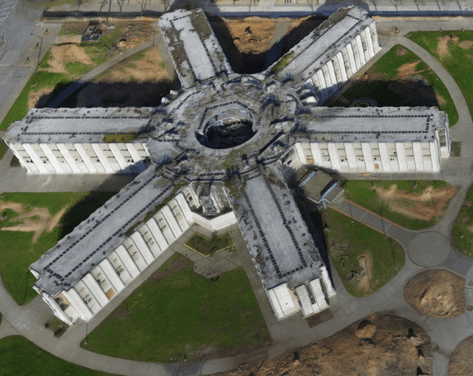
Today, Jeff flies a DJI Inspire 1 with X3 and X5 cameras, as well as a DJI Phantom 3. In this blog post, Jeff will walk through the steps he took to create a 3D model of the abandoned Navy dorms on Treasure Island, near San Francisco, using his Phantom 3 Professional drone.
Step 1: Pick a Time to Fly
According to Jeff, one of the most important steps in using your drone to make a 3D model is to pick a good time to fly. Besides avoiding high winds or rain, it’s also important to pick a time with good lighting.
“If it’s an overcast day, that’s best because there aren’t strong shadows”, said Jeff. “I usually pick sometime around noon where there are the shortest shadows possible, but you don’t always get a chance to choose that.” [Click to tweet]
The worst time of day? Too early or too late in the day because that’s when the shadows are longest and will have the greatest affect on the outcome of the model.
When flying at the abandoned Navy dorms, Jeff flew around 10am on a partly-cloudy day.
Step 2: Capture Nadir Imagery
Jeff likes to start by capturing nadir imagery, photos captured from directly above looking down, using the free DroneDeploy flight app (iOS or Android). He simply outlines the area he wants to fly on a base layer map, and the app generates a flight plan. Following a safety check, the drone automatically takes off, flies along the automated flight path capturing images and then lands.
“I’ve been flying for a few years and other mapping software that I’ve played with is a little scary because it doesn’t always do what you expect it to do. The DroneDeploy flight app has been really solid — it’s really phenomenal.” — Jeff Foster
Step 3: Circle the Structure to Capture Oblique Imagery
If you’re making a 3D model of relatively flat terrain, an overhead flight might be sufficient to make a good model. However, if you’re modeling a structure or rock formation with steep, vertical or concave sides, overhead images don’t capture a good view of the sides of the structure. For this reason, Jeff recommends flying two additional orbital flights around the structure capturing oblique imagery to improve the quality of your model. [Click to tweet]
“Getting the manual oblique images, in addition to the automated ones on top, gets me a lot better results than just shooting from the top” — Jeff Foster

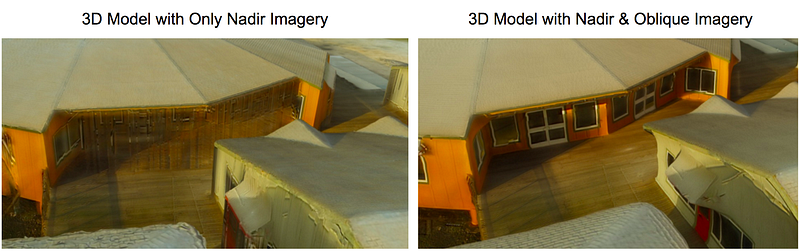
Jeff captures manual obliques by tilting the camera 45 degrees and flying around the structure at a fixed radius at the same altitude as the original nadir flight. “Then I’ll come down about half the altitude and angle the camera close to 90 degrees and circle the structure again,” said Jeff.
When capturing oblique images it’s important to avoid capturing the horizon within your images. When Jeff makes these two orbital flights, he manually triggers the camera shutter to take each picture. However if you’re just starting out, you might experiment with flying very slowly and setting the camera through your drone’s flight app to automatically capture images every 3–5 seconds.
In some cases, where the structure is more intricate or includes overhangs (such as the eves on a house), Jeff may even do a third — possibly handheld — orbit from an even lower angle, pointing the camera up to 90 degrees.

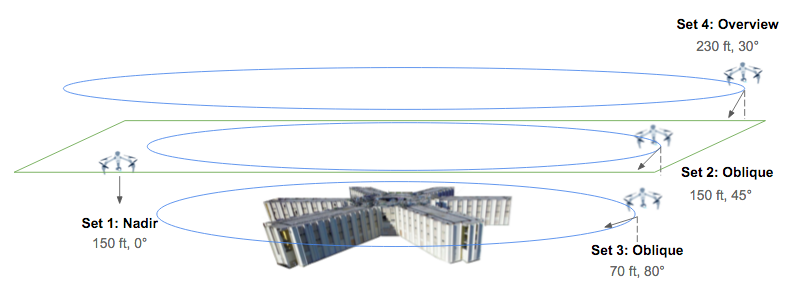
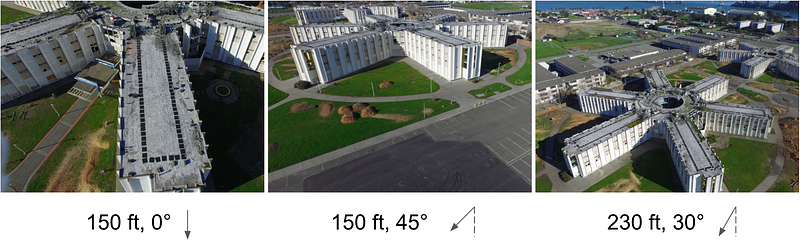
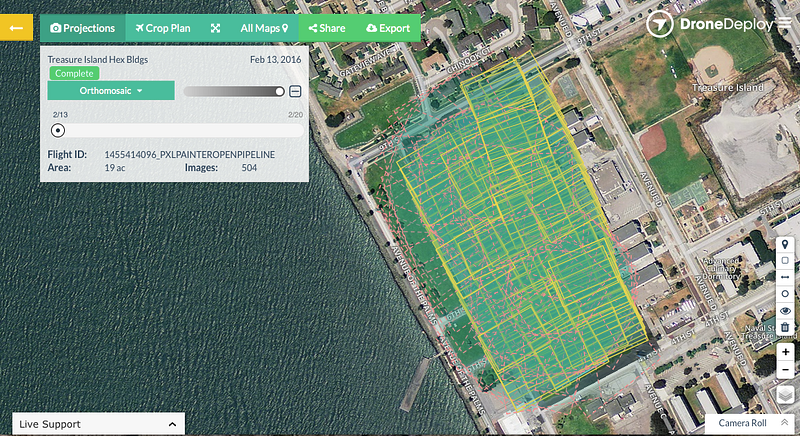
At the abandoned Navy dorms, Jeff made three additional flights to capture oblique imagery. One at 150 feet with the camera angled 45 degrees, and another at 70 feet with the camera angled at approximately 80 degrees. Then he did a final overview pass at about 30 degrees at around 230 feet to capture the entire area. The four flights, including obliques and nadir, took about 45 minutes total and covered approximately 10 acres.

Step 4: Process the Imagery to Generate Your 3D Model
Once he finished flying, Jeff uploaded 504 photos from all four flights to DroneDeploy and chose to process the imagery as a “structure.” After a few hours, DroneDeploy’s cloud-based processing stitched all the images together and the 3D model was complete!

Explore the Completed 3D Model
Explore the interactive 3D model (below) or watch the fly-through video (further below).

DroneDeploy 3D model: Treasure Island
by DroneDeploy
on Sketchfab

Watch a 3D fly-through video of the abandoned Navy dorms.
The Most Common Mistake
Jeff said that one of the most common mistakes pilots make is that they’re “not consistent with what they’re shooting — it takes time to get proficient in flying and some don’t take the time to learn.” Elaborating further, Jeff said that novice pilots “may not get enough overlap between images or cover enough area if they’re flying manually.” [Click to tweet]
How do you avoid this mistake? “Practice, practice, practice!” Jeff recommends practicing in big wide open spaces or with flights way above the tree line. To ensure sufficient overlap between images, err on the side of taking images more frequently and covering more of the surface of the structure.
Commercial Applications for 3D Models
Drone enthusiasts aren’t the only ones using drones to make 3D models. Construction sites commonly use 3D models to evaluate the topography of a site, identify earthmoving needs, and to monitor progress of projects against project schedules. Other industries using drone-based 3D modeling include mining and inspection.
Jeff is excited about the potential uses for drone-based 3D models in environmental conservation. He has been experimenting with using drones to measure and model high and low tide along the bay. “You can see differences in 3D. You can see urbanization affecting erosion along the wetlands — that has important intrinsic value here and now,” said Jeff.

Where to Learn More
To learn more about how to make 3D models with DroneDeploy, check out the 3D modeling with drones in our support documentation. Drone Coalition and Flite Test also include tutorials showing how to make 3D models with DroneDeploy. If you still have additional questions about making great 3D models, ask other flyers within the community forum.
Make Free 3D Models with DroneDeploy
It’s easy and free to start making 3D models with DroneDeploy. Just signup for an account or download our flight app on the App Store or Google Play.


Frank Schroth is editor in chief of DroneLife, the authoritative source for news and analysis on the drone industry: it’s people, products, trends, and events.
Email Frank
TWITTER:@fschroth